Tag Archives: gold

Gold with Black Swirls – Nail Art

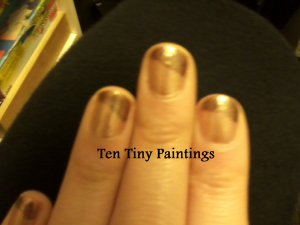
This is the final design I did to cover up the nail art fail of Fall Dots Attempt 1. I knew I had to try something glittery, because it is the easiest way to cover a bad design, especially one with dark splotches. The glitter covers the design because you can’t see through the metal bits of glitter, and if it doesn’t cover the design completely, it is really hard to see the design between the pieces glitter because they reflect light.

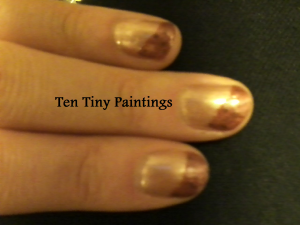
So here’s the (not creatively titled) Gold with Black Swirls design!

Gold with Black Swirls by Shelly Najjar at Ten Tiny Paintings

Note: I did a couple of designs on the way to the final one, so I if you want to see them all, start here. If you want to see the simple steps to doing only the Gold with Black Swirls design, keep reading below.
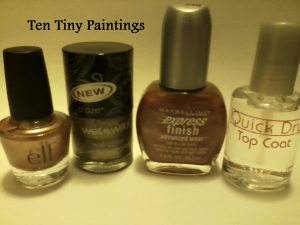
What I used:

Supplies for Gold with Black Swirls design by Shelly Najjar at Ten Tiny Paintings

  • base coat (not shown)
  • Wet Sand by Maybelline New York
  • Black liquid eyeliner (can also use black Sharpie or black polish applied with striper)
  • generic quick dry top coat

What I did:

Step 1: After a base coat dries (or, if you are using this design to cover up a different one like I did, until the old top coat dries), add two coats of Wet Sand (or any gold polish).

Step 2: Begin by drawing a backwards (almost) “S” shape on the nail with the black eyeliner/striper/Sharpie. Add dots around the curve near the tip and a spiral swirl next to the curve near the base. To make this step easier, take your time, and you can think of all the shapes as connected “C” shapes.

Step 3: Finish with top coat and let dry.

Gold with Black Swirls Nail Art by Shelly Najjar at Ten Tiny Paintings

See all the posts in this series:

  1. Fall Dots (Attempt #1) = Fail
  2. Diagonal Autumn Tips
  3. Gold Gradient
  4. Gold with Black Swirls (this post)

Gold Gradient – Nail Art

This simple design was used to cover a previously horrible design. It is also the intermediate design to the Gold with Black Swirls design.

Gold Gradient Nail Art design / by Shelly Najjar at Ten Tiny Paintings

What I used:

Supplies for Gold Gradient design by Shelly Najjar at Ten Tiny Paintings

  • Base coat (not shown)
  • Blush by e.l.f. (part of Necessary Nails collection)
  • Shield by Wet n Wild
  • Wet Sand by Maybelline New York
  • generic quick dry top coat

What I did:

Step 1: Base coat (I already had this on from the earlier design, but if you’re starting from blank nails, you will want to add a base coat).

Step 2: Apply two coats of Blush by e.l.f. to the whole nail (also already on from the earlier design).

Step 3: Apply two coats of Shield to the nail tip.

Step 4: Apply one thin layer of Wet Sand to the whole nail, leaving the Blush showing through the gold at the base of the nail.

Step 5: Paint two thirds of the nail (from tip toward base) with Wet Sand again.

Step 6: Paint a thin layer of Shield over the tip again.

Step 7: Cover with top coat and let dry.

See all the posts in this series:

  1. Fall Dots (Attempt #1) = Fail
  2. Diagonal Autumn Tips
  3. Gold Gradient (this post)
  4. Gold with Black Swirls

Diagonal Autumn Tips – Nail Art

This was an intermediate design created to cover up a design fail. I know the index finger isn’t really at that much of a diagonal, but I didn’t care because it was an intermediate design I was going to cover up anyway. If I did this for real, from the start, I would use tape to make sure the lines were straight going from corner on one side to midway on the other side.

Diagonal Autumn Tips Final Design by Shelly Najjar at Ten Tiny Paintings

What I used:

Supplies for Diagonal Autumn Tips Nail Art design by Shelly Najjar at Ten Tiny Paintings

  • Base coat (not shown)
  • Blush by e.l.f. (part of Necessary Nails collection)
  • Shield by Wet n Wild
  • Quicksand by Maybelline New York
  • generic quick dry top coat

How I did it/would have done it if I were starting from the beginning:

Step 1: Base coat (I already had this on from the earlier design, but if you’re starting from blank nails, you will want to add a base coat)

Step 2: Apply two coats of Blush by e.l.f. (also already on from the earlier design)

Step 3: At a diagonal, apply one coat Quicksand by Maybelline NY to tip. You can use a piece of tape (if Blush color is completely dry) to make the line straighter.  (I didn’t care because it was going to be covered up anyway. If I were doing this from the beginning I would also make more of an effort to make these diagonal, because the index finger’s almost just a plain curved tip, but I had to cover up any place I put the old design, and I wasn’t very careful to keep the line straight. You can also still see the paint underneath the red color, but don’t worry, you can’t see it after the next step)

Red step for Diagonal Autumn Tips Nail Art design by Shelly Najjar at Ten Tiny Paintings

Step 4: When dry, paint one coat of Shield by Wet n Wild on top of the diagonal tip.

Step 5: Top coat. (I skipped this because this was an intermediate design and going to be covered up)

[Covered up with Gold Gradient]

See all the posts in this series:

  1. Fall Dots (Attempt #1) = Fail
  2. Diagonal Autumn Tips (this post)
  3. Gold Gradient
  4. Gold with Black Swirls

Brushed with Gold – Nail Art

Brushed with Gold by Shelly Najjar

This is a super quick idea (less than 10 minutes) that is great for unsteady hands and nails of any size. You can change the colors if you want to make a variety of looks.

What I used:

Supplies for Brushed with Gold design by Shelly Najjar

  • White glue base coat applied with plastic paint brush
  • Chocolate by e.l.f. (part of Necessary Nails collection)
  • Wet Sand by Maybelline New York
  • Clear quick dry top coat (generic)

What I did:

Step 1: I decided to use the white glue base coat again. After it was dry, I did one coat of the Chocolate by e.l.f. This is where you could use whatever solid color you want.

Step 2: When that dried, using the Wet Sand (gold) by Maybelline NY, I wiped off most of the brush and only applied a thin layer to the center part of the nail, brushing it outward in all directions but not covering the bottom color completely. You could use any metallic color here.

Step 3: Let dry and cover with top coat.